

The holidays are happening! Are you wondering what you should bake or cook this winter season? A few of our staff members got together to share their favorite foods to eat during the holidays. We would love to share them as a gift to you, too.

NEHEMIAH BESTER
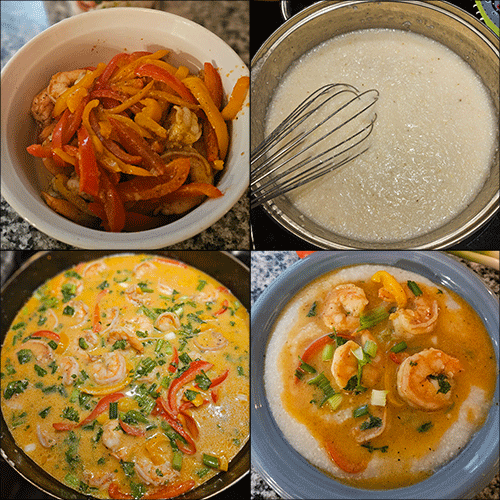
One of my mother Loretta’s specialties is shrimp and grits. She cooks from memory alone, so I first have to thank her for writing this down for me.
Growing up in a household with four other siblings, her shrimp and grits were a delicacy to us. Her culinary techniques made this meal perfect to eat during any mealtime: breakfast, lunch, or dinner. Personally, breakfast was my favorite. Nothing beats waking up lazily on a Sunday morning to the inviting smell of Old Bay-seasoned shrimp and buttered grits. Around the holiday season, she always has her door open to friends, family, and new acquaintances in need of a hot meal and a laugh or two, or three. It’s one of my favorite dishes from my mom and I hope you enjoy this recipe as much as my sisters and I do.
Loretta's Shrimp and Grits
Ingredients:
- 1 pound shrimp
- 2 cups grits
- Salt
- ½ box chicken stock
- 2 tablespoons heavy cream
- 1 each red, yellow, and green bell peppers
- 1 small onion
- 1 stick butter
- Corn starch
- Black pepper
- Onion powder
- Garlic
- ½ teaspoon paprika
- ½ teaspoon garlic powder
- ½ teaspoon Old Bay seasoning
- Creole seasoning
- Green onion
- Chives
Directions for shrimp:
- Clean and devein shrimp.
- Season with Old Bay, paprika, and garlic powder.
- Tony Chachere’s creole seasoning and black pepper.
- Let those marinate.
Directions for grits:
- Boil water.
- Add salt.
- Stir in grits.
- Whisk constantly until thick.
- Add some chicken stock and heavy cream.
- Stir.
- Low heat setting.
In separate frying pan:
- Sauté 1 red, yellow, green pepper, and 1 small onion in a frying pan.
- Add one stick of butter.
- Let onions cook until clear.
- Cook shrimp until pink.
- Remove vegetables and shrimp from frying pan.
- In the same pan, add a half box of chicken stock, creole seasoning, minced garlic.
- Stir. Corn starch is added to thicken the sauce.
- Stir in heavy cream.
- Season to taste with black pepper, onion powder, garlic powder, chives.
- Added diced green onion.
- Once the sauce is preferred thickness, add vegetables and shrimp back in.
- Let simmer for a few minutes.
- Optional, garnish with green onions and cilantro.
- Plate and bon appetit!
NICOLE MCCANN
My favorite holiday recipe is one I've found to be quite controversial. People have intense reactions to green bean casserole. Despite people either loving or hating it (and being more than happy to let me know where they fall), it's my favorite holiday dish. I've tried to figure out why I like it so much, and honestly, I think it's because of the crispy fried onions on top.
While I was growing up, my mom made it with just three ingredients: French-cut style green beans, cream of mushroom soup, and fried onions. As an adult who primarily eats vegan food, I use the Post Punk Kitchen recipe. This recipe is just so freaking good.
Green Bean Casserole
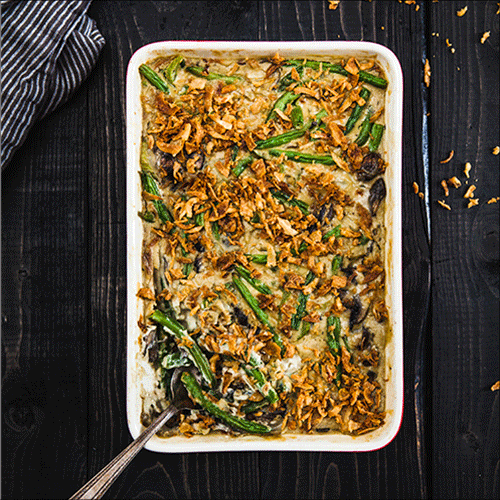
Ingredients:
- 1 cup raw cashews, soaked in water for at least 2 hours and drained (skip the soaking step if you have a Vitamix or other high-speed blender)
- 3 cups vegetable broth, purchased or homemade
- 1⁄2 cup all-purpose flour 2 tablespoons nutritional yeast flakes 2 tablespoons olive oil
- 1 pound green beans, trimmed and cut into 2-inch pieces (about 4 cups)
- 1 small onion, finely chopped
- 1 teaspoon salt, plus a pinch 4 cups sliced cremini mushrooms 1 tablespoon onion powder freshly ground black pepper 1 (6-ounce) can fried onions
Directions:
- Preheat the oven to 375°F. Lightly grease a 9-by-13-inch casserole dish.
- Combine the cashews, broth, flour, and nutritional yeast in a blender. Puree until completely smooth; this can take up to 5 minutes depending on the strength of your machine. Periodically stop the machine to prevent it from overheating and scrape down the sides of the blender jar with a rubber spatula make sure you get everything.
- Meanwhile, heat a large sauté pan over medium-high heat. Heat the olive oil, then sauté the green beans and onion with a pinch of salt until the green beans are softened, about 5 minutes. Add the mushrooms and sauté 7 to 10 minutes more. The mushrooms should have released most of their moisture.
- Add the blender mixture to the pan, along with the onion powder, remaining 1 teaspoon salt, and a few grinds of black pepper. Cook, stirring often, until thickened, about 10 minutes. Add half of the fried onions.
- Transfer the green bean mixture to the casserole and top with the remaining fried onions. Bake until browned and bubbly, 22 to 25 minutes. Let cool for a few minutes before serving.

DANA VICKERS SHELLEY
Sweet Potato Pound Cake
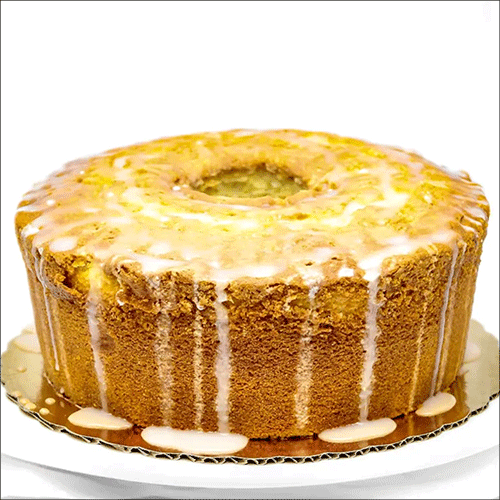
- Go to Baked in Baltimore, 6848 Reisterstown Road, Baltimore, MD 21215.
- Order 1 “Sweet Potato Pound Cake.”
- Carefully take cake home.
- Slice and enjoy.*
*The cake can be sliced, placed in zip-loc bags, and frozen if it won’t be consumed in 2-5 days.

NICK TAICHI STEINER
On New Year’s Eve, our family eats Toshi-koshi soba 年越しそば, which is usually soba noodles eaten in a hot soup, since New Year’s is a winter holiday. Toshi-koshi soba is a New Year’s dish that literally means “year-crossing” noodles. It symbolizes the cutting of hardship from the previous year, since soba noodles are easily “cut” when eaten.
In our family though, we eat it “zaru,” or cold, eaten with a dipping broth. Maybe because my mom, who passed away in 2021, grew up in Morioka, Japan, and was channeling Morioka’s local soba, wanko soba わんこそば, or maybe because she just prepared the soba how I liked it, while keeping the tradition of eating soba to usher in the New Year. Either way, we have our version of Toshi-koshi soba to bring us into the new year.
We also eat O-Zouni お雑煮, which is a hot soup with chicken, mochi, carrots, and shiitake mushrooms, in a clear broth. O-Zouni incorporates another New Year’s staple into the soup: mochi. Freshly pounded mochi, especially in O-Zouni, will melt in your mouth because it is so soft, and is one of the most delicious foods in the world.
Recipe for O-Zouni
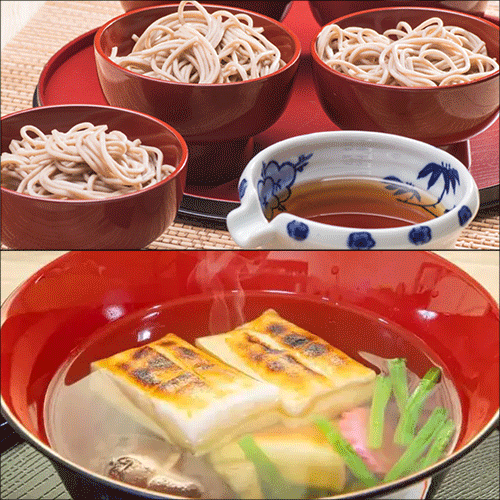
- Soup: Dashi and water (stock from dried bonito fish), and soy sauce
- Chicken
- Carrots, cut into flowers
- Mochi (if using kirimochi, or shelf stable mochi, toast in the toaster oven, or microwave to soften)
- Shiitake mushrooms
- Spinach or other green vegetables
Learn more about roots of wanko soba and O-Zouni.

VERONICA DUNLAP
During the holidays, my family loves to gather around delicious spicy food. We even like to give our beverages a little kick. Here’s my version of Spiced Hibiscus Tea.
Spiced Hibiscus Tea

Ingredients:
- 8 cups of water
- ½ cup of dried hibiscus leaves
- Juice from ½ lemon (save the rest for garnish)
- ¼ cup of fresh ginger (roughly chopped)
- ½ teaspoon of cinnamon
- Pinch of ground cloves
- ½ cup light agave nectar
- Bottle or pitcher to store tea
Instructions:
- In a medium saucepan, heat the water to a rolling boil.
- While the water boils, slice the lemon, squeeze the juice from half of it and set aside.
- Chop the ginger into half inch chunks (do not peel) and set aside.
- When the water boils, turn off the heat source and add all ingredients, except the light agave nectar.
- Cover the saucepan and allow the tea to steep for at least ½ hour or until almost fully cooled.
- Pour the light agave into the bottle or pitcher.
- Place in the fridge to chill for at least an hour.
- Serve over ice and garnish with lemon slices. Enjoy!

ALICIA SMITH
This is probably the first recipe I made consistently that made me realize at a younger age that I loved to bake. I found a recipe online when I was a teenager and put my own spin on it, and the result was something I loved to eat and really enjoyed making. I started to bring them to family holiday gatherings and would share them with friends as a homemade tasty gift.
It wasn’t until after college that I found someone who loved them as much as I did: my brother’s then girlfriend (now his wife and my sister-in-law). She requests them every year and is furious when she doesn’t get a giant batch delivered to their doorstep haha! She has even sent me photos of her having a couple of pumpkin chocolate chip cookies for breakfast lol.
I grew up watching the women in my family create legendary symphonies from a few disconnected notes. When they entered the kitchen, they could transform any ingredient into delicious meals, side dishes, and desserts – they were masters in the art of making something out of nothing.
As I grew up, I knew that one day that responsibility would someday pass down to my sister and I (and anyone else who was lucky enough to join our eccentric bunch). Thankfully, we still have our parents around to help guide us along the way, but we’ve started to take our culinary steps as well. Holidays have grown and changed in some ways, but one main ingredient remains the same – love.
Pumpkin Chocolate Chip Cookies

Ingredients:
- 1 cup (2 sticks) salted butter, softened
- 1 cup white sugar
- 1 cup light brown sugar
- 2 large eggs
- 1 teaspoon vanilla extract
- 1 cup canned pumpkin puree
- 3 cups all-purpose flour
- 2 teaspoons baking soda
- 1 teaspoon ground cinnamon
- ½ teaspoon ground ginger
- ¼ teaspoon ground nutmeg
- ¼ teaspoon ground cloves
- Dash of pumpkin pie spice (usually no more than a tablespoon)
- 2 cups (12-ounce bag) milk chocolate chips
- baking grease (small thing of Crisco should do)
Directions:
- Heat the oven to 350 degrees F. Spread thin layer of baking grease on pan or sheet (even for nonstick sheets). Grease the pan between batches. Recipe can be doubled for large quantity (regular recipe yields 40 decent sized cookies).
- Mix dry ingredients in a bowl. Mix wet ingredients together in a separate bowl. Pour wet ingredients into dry ingredients increments, slowly blending until dough is one. Taste test to your liking. Add milk chocolate chips – mix in with spoon so not to crush the chips.
- Scoop dough onto pans in tablespoon sizes. Place them at least an inch or two apart so they don’t run together. Place sheets in oven and bake for approximately 13-15 minutes (adjust time depending on preferred cookie consistency). Once edges are golden brown (not too crisp) remove batches from oven and place in safe place too cool for 3-5 minutes. Eat and enjoy!
PRO TIP: Store cookies in air-safe container for good keeping. If cookies have hardened after a week or so, place a slice of bread in the container to re-soften the cookies.